Top 10 of the world’s scariest airports. These are some of the most dangerous airport landings. The most extreme, scariest and hairiest of all airports in the world. The airports on the this list are because of their extreme locations at high altitudes, difficult approaches, or short runways, all of which make landings challenging.


Here are 10 of the world’s most dangerous airport landings:

10. Saba Airport – World’s Shortest Commercial Airport Runway.

Dangerous Airport Landings in The World
Located about 28 miles south of St. Maarten. The Saba International Airport has the world’s shortest commercial airport runway. It is 400 meters (1300 feet) in total length. Considered the most dangerous airport for landing. This landing strip looks incredible. You have to be a Sharp-shooting pilot, to land your jet here.

9. Toncontin Airport, Tegucigalpa, Honduras.

scary airport
Getting through the mountains is only one hurdle to overcome for a safe landing in Tegucigalpa, Honduras. Toncontin has a number of strikes against it. It’s situated in a valley 3,294 feet (1,004 m) above sea level. During descent, planes need to make a 45-degree bank to effectively reach the 7,000-foot runway located in a valley. Due to the surrounding mountainous terrain, passengers will experience a quick drop in altitude in order for the plane to line up with the runway. Frequent winds complicate matters, as pilots are forced to make several last-second adjustments. One of the most dangerous airport landings.

8. Landing at LaGuardia Airport in New York City, U.S.A.

US Airports
Stunning city views when landing – USA.The main, 7,000-foot runways over water at New York’s LaGuardia Airport were extended back in 196. In case gliding over Flushing and Bowery bays isn’t enough of a thrill. pilots have to avoid interfering with flights from two other extremely busy airports nearby: JFK and Newark. Another disturbing fact: A peek at the airport’s location shows that it is located just eight miles from the city of Midtown Manhattan.

7. Nail-biting landings at Courchevel International Airport in France.

France airports
The Courchevel airport is known to have the shortest runway at just 525 meters long. added to that the runway has a gradient of 18.5%. aspects that affect take-offs and landings daily. World’s most dangerous airport landing. Here, pilots are required to navigate the popular Alps Mountain before landing. If that is not enough to give you goosebumps, planes must touch down at inclined angles just to slow down.

6. Extreme landings at Wellington International Airport in New Zealand.

New Zeeland Airports
With a single, short, 6,351-foot runway that appears to begin and end in crystal blue waters. it’s easy to see why flying into Wellington may make you uneasy. To those who call it home, flying into Wellington airport is a joy, but it is not for the faint at heart. Sometimes the danger approaches just when it is almost time to disembark.

5. Scary Kai Tak Airport landing in Hong Kong.

Kai Tak Airport
The world’s scariest airport landings and take-offs. Strong crosswinds and the surrounding mountains only added to the difficulties of landing here. At one time, travelers were quite upbeat about Kai Tak airport in Hong Kong. However, this was before it was christened “the mother of all scary airports.” The airport that brought us the most dangerous airports landings on earth closed in 1998. It used to be the base of Cathay Pacific as well as many regional carriers. Aircraft pilots were careful to infuse dollops of caution when making a landing or taking off.

4. Hair-Raising Landing at Lukla Airport in Nepal.

Lukla Airport in Nepal
Renamed to Tenzing-Hillary Airport in honour of the two men who first conquered Mount Everest. Visitors to Mount Everest frequently use this Nepalese airport. The landing and take-off strips here are very short. The airport operates at an altitude of 8,000 feet (2,438 m) and has virtually no modern air traffic control features. Not even lights, and very little electric power at all. It is one of most dangerous Airports landing. Because that Mount Everest is considered to be the highest point on Earth.

3. Slippery landing on the Ice Runway in Antarctica.

Ice Runway in Antarctica
The coldest spot on the planet. The fact that there are no paved runways in Antarctica is enough to make you bite your fingers. Everything under the plane is a long stretch of manicured snow and ice. The one crucial challenge is the weight of the aircraft that must land on this runway. The weight of each plane must be checked to avoid it cracking the ice landing strip or the plane getting stuck in the snow.

2. Hairy landing at Princess Juliana International Airport in St. Maarten.

Princess Juliana International Airport
One of the busiest airports in the Caribbean. To land on Princess Juliana International Airport, pilots have to fly over a little part of the beach, cross over the fence and then pass over the road and then land on the runway. It is the most dangerous airport in the world. The airport’s landing strip is just too short at only 7,150 feet long. Large aircraft need at least 8,000 feet to insure a safe landing while some really heavy planes require 10,000 feet. It was built for small and medium planes. However, jumbos such as A340s and the 747s do land here.

1. Paro Airport in Bhutan, Himalayan Mountains.

Paro Airport in Bhutan, Himalayan Mountians
This Himalayan airport is top of the most dangerous airport landings. Only eight pilots are qualified to land here. The Airport is 1.5 miles above sea level and surrounded by sharp peaks of up to 18,000 ft tall. The runway is just 6,500 feet long. One of the few in the world shorter than their elevation above sea level. Passengers flying to this remote region may have to take something to steady their nerves. The tiny airport nestled among the steep mountains of the Himalayas is said to be the most dangerous in the world.


Did you know your phone, especially if it's an up to date model, is packed full of little instruments you can actually use to perform some basic experiments?
Many of these tiny instruments are used by the phone's basic software, and third-party apps, to act as data collectors to help with some of its features, like GPS etc. 

For instance, most can now be used to measure:-
- Acceleration;
- Magnetic fields;
- Sound;
- Geospatial location and;
- Some can even measure atmospheric pressure.

Isn't that interesting, if perhaps, a little worrying?
Of course, you will also need some specialist applications to 'unlock' your phone's inner scientific potential. A great example of just such an app is called Phyphox.
It is free to download and is also cross-platform - so that's handy. Any and all data recorded using this app can be shared as screenshots, accessed remotely or you can export the data in a variety of formats from excel to CSV files - which is pretty handy. 
However, if your phone lacks some equipment (like a barometer) some of the experiments/features will be greyed out. 
There are other data collection/science apps out there (like Google's Science Journal App) but this article will focus on those provided by Phyphox. 

Experiment #1 - Measuring the duration of freefall

This interesting experiment will let measure the duration of a freefall using your humble smartphone. 
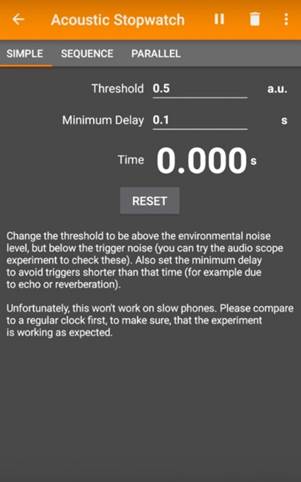
If you've downloaded the app this experiment requires the use of the "Acoustic Stopwatch" function. This experiment will time the elapses between two loud acoustic events. 
You will need to enter a few parameters before you start. First and foremost set the threshold value to enable you to tweak a trigger noise that is louder than the ambient noise levels.
This will take some trial and error, as you can imagine, so keep changing the value until the ambient noise doesn't trigger the stopwatch.
There is also another parameter to set - the minimum delay. As any noise tends to have a duration this prevents the same 'sound event' from stopping and starting the timer multiple times and spoiling your experiment.
10 Fun Science Experiments You Can Conduct Using Your Phone


As you can imagine the delay must always be smaller than the total freefall time.
A simple setup would be some object to drop, a ruler (metal is best) and another long object like a pen. Now balance the ruler and object over the edge of a flat surface like a table. 
With the acoustic stopwatch activated strike the ruler on the edge so that the object falls off the ruler and drops to the floor. The stopwatch should trigger when the ruler 'rings' from the impact (if metal) and stop when your phone's microphone detects the impact of the object on the floor.
Clearly, this will not work well in a noisier environment so you can experiment with 'bigger' and 'better' apparatus. For instance, you could use a balloon (held in a metal hoop on a pole) to suspend the weight and have a metal target underneath.
Popping the balloon acts as the initial trigger and the object hitting the metal plate on the floor should generate enough noise for the stopwatch to detect in noisier environments (like a classroom say). 
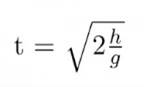
By repeating it a few times at different heights, the time should be the square root of 2 times the drop height divided by the gravitational acceleration towards the Earth of 9.81 m/s2.fun phone science experiments freefall
 Give it a go!

Experiment #2 - Measure the length of a pendulum from pivot to center of mass

Here's another fun experiment using your phone you can easily perform at home. Once again make sure you have the app open and go find yourself some string. 
Then open the Phyphox app (or alternative) and find the pendulum experiment from the menu. Before you start swinging your phone around like 'it's no-one's business' you'll need to make some preparations first. 
On the pendulum app's menu, you'll need to tap on the length tab on the top. You'll then need to select the "timed run" box on the menu. Now you'll need to set the start delay as well as experimental duration.
For best results, you should set these to 3 and 10 seconds respectively. This means the app will wait 3 seconds before running and will automatically switch off 10 seconds after that.
Now for the fun bit. Attach some string to your phone, press start and set you phone pendulum "a-swinging". If the experiment went well the app should have determined the length of the string of the pendulum from a pivot point to the phone's center of mass. 
To prevent the phone swinging during the experiment you could build a simple cradle out of a toilet tissue tube or come up with your own solution. 

Experiment #3 - Use a Magnetic Ruler to measure the speed of things

This is another cool experiment you can run using your phone (and data collecting app of course). For this, once again, you'll need the Phyphox (or equivalent) application and a couple of magnets. 
Decide what you want to measure the speed of but it must be something big enough to carry the phone. Then place the magnets along the length of the path at regular intervals in preparation - obviously not too close together.
Also, make sure the magnets are all aligned in the same polarity.
Your choice of magnets will depend completely on the setup of your experiment and the length of the distance between the magnets and your phone. For instance, if you wanted to use a train set with height from magnet to phone being around 7 cm small rare earth metal ones should work fine.
But be warned very strong magnets can, and will, damage your phone especially its compass functions. If between 1 micro- to 1 milli- Tesla it should be fine (yes there is an app to measure that too). 
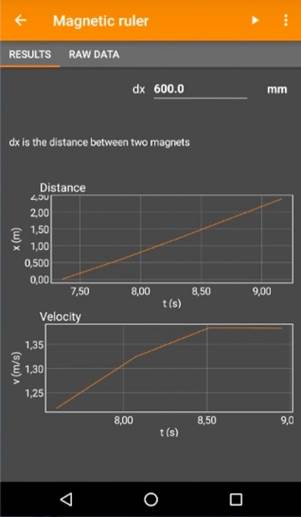
Now strap your phone with the application activated and select the "Magnetic Ruler" experiment. Now enter your pre-determined magnet spacing and off you go. 
The app will count the number of magnets it passes as well as simultaneously measuring the travel time. 
10 Fun Science Experiments You Can Conduct Using Your Phone
 

Experiment #4 - Calculate the speed of a rolling object

This fun phone experiment will let you measure the speed of a rolling object. For this experiment, apart from the app, you'll need a second device to receive and display data remotely.
You'll also need some form of container to house your phone as it rolls around. Cardboard tubes are ideal and you should try to find one roughly the same width as your smartphone.
The second device, whether it be a tablet, PC or another phone, will need its most up to date web browser but other than that it doesn't need to be anything too fancy. It will also need to be on the same network as your to-be smartphone rolling sensor. 
Now to prepare the experiment. If you are using Phyphox open the app and select the "Rolling Experiment" under the mechanics heading. You will be asked to enter the radius of the tube (or other roller apparatus).
Measure it and enter the result in the application. You will also need to activate the remote access setting in the main menu (top right menu icon). 
You will be provided with a URL to enter into your second devices web browser. Now place your smartphone (with the activated app) inside the roller and use some padding to wedge it as close to the center as possible - obviously be careful not to turn off/close the app or change any settings - the display will remain open throughout.
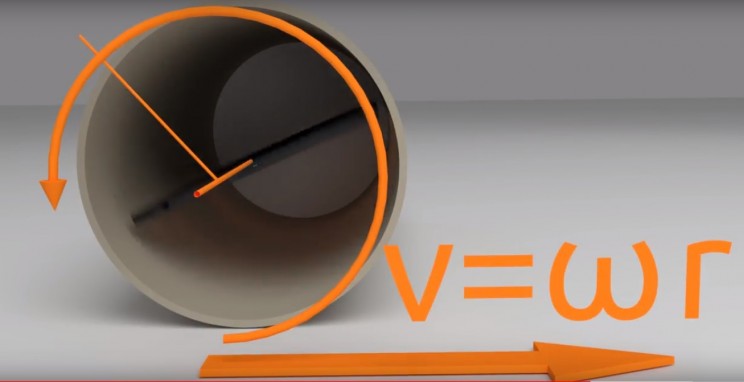
The app will now make use of your phone's inbuilt gyroscope to calculate the rollers tangential velocity and share the information on your second devices monitor. 
Fun!
fun phone experiments roller speed
 

Experiment #5 - Turn your smartphone into a SONAR device

Using a data collecting app, like Phyphox, you can actually turn your phone into a rudimentary SONAR device. With the example app provided, it uses your speaker to send out a series of 'chirps' and 'listens' for the reflection off a target using the phone's microphone.
To conduct controlled experiments you will need to insulate your phone from all other directions apart from the target direction to try to attenuate as much 'noise' as possible. After all, the phone will receive signals from all directions (walls, ceilings and pretty much everything around it) without some form of insulation. 
You can use foam sections to create a container to fit the phone in and then select a target to measure the distance of it from the phone. Anything will do but flat metal objects tend to work great. 
Like previous experiments, you can use the second device to receive and display the information remotely for ease of access. 
With your insulated container built activate the application and get 'SONAR'ing'. You might want to also set up a ruler or tape measure to verify the results provided. 
The application will use the speed of sound to calculate the distance of any reflections it receives. You should see a distinct spike at the distance the target object is set, for instance, 1 meter away. 

Experiment #6 - Measuring the speed of an elevator

Phyphox, and other data collection apps can allow you to measure the speed of an elevator - if you've ever wondered about that of course.
As you'd imagine you'll need an elevator to conduct this experiment but beyond that, all you need is your phone and app in hand. There is one catch, however.
Your phone will need to come equipped with a barometer. If you aren't sure if your phone has this built-in piece of kit the app will soon you let you know when you try to activate the "Elevator" experiment in the Phyphox app menu.
If you have a barometer then great. To run this experiment turn on the app and select the elevator experiment from the menu.
Then place your phone on the floor of the elevator then select the floor you wish to travel to. For best results, you should try to travel at least three floors.
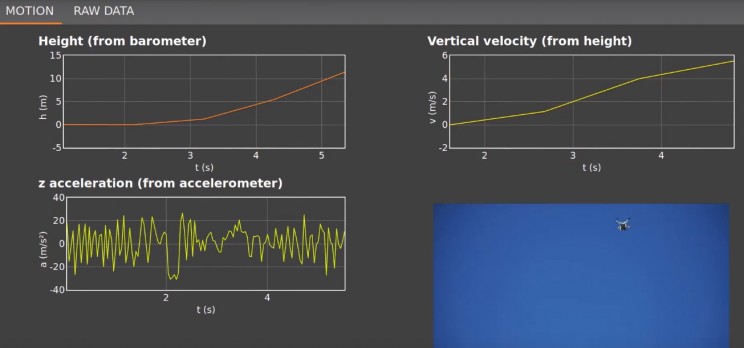
The application then records the changes in atmospheric pressure as the lift ascends or descends in the lift shaft. Using the barometric formula the app is able to determine the distance of travel, vertical velocity and can record the acceleration of the lift using your phone's accelerometer.
You can adapt the experiment for pretty much anything that can carry your phone too. If you have a strong enough drone, like a quadcopter, you can perform the same experiment on those devices. 
Of course for this, you might want to share the data remotely, as above, on a second device. 
fun phone experiments speed of lift
 

Experiment #7 - Measure the speed of sound (almost)

This is one of the simpler experiments you can conduct on your smartphone. As you'd expect you'll need to have a data recording app like Phyphox installed on your device before conducting this.
You will also need two phones with the same app installed, somewhere to conduct the experiment and a tape measure to set the two phones a set distance apart. As with other acoustic based experiments on the list, you'll need to fiddle with the threshold values to make sure ambient noise is canceled out.
Open the apps on both phones (with the same settings) and place them at a set distance apart. Now all you need to do is to clap directly next to one of the phones. 
Then have a colleague (or walk between the two very quietly) and clap next the second. The first clap will trigger the app's stopwatch closest to you almost instantaneously and trigger the second phone a little later in time. 
When you then clap next to the second phone the stopwatch will stop immediately on the second phone and after a short delay on the second as sound travels to the other phone. 
The speed of sound should be then be 'easily' found using the following formula:-
 v = 2 x d / ( Δt)
Where:-
v = speed of sound
d = distance between phones
Δt  = time delay difference between the two phones results.
Of course, given the relatively simple setup, you will likely get varying results depending on air temp and other variables. The accepted value for the speed of sound should be around 343 m/s at 21 degrees centigrade FYI.  

Experiment #8 - Measure the rotation rate of a fidget spinner

Here is another simple, yet fun, experiment you can conduct using your phone (and app of course). If you have ever wondered about the rotation frequency of a fidget spinner now is your chance to find out.
All you need is a smartphone (iOS or Android) with a data collection app like Phyphox installed and a fidget spinner (of course). To do this experiment we will need to magnetize part of the fidget spinner so that your phone's magnetometer can detect its magnetic field.
Of course, this depends on whether your smartphone has this kind of sensor built into it. If not you're out of luck. 
You will need to take a permanent magnet of some kind and rub it against the metal rings in one of the arms. Do this for a few seconds and it should be enough to induce a small magnetic charge that the app can detect to measure the spin speed.
Now activate the app and select the magnetometer experiment. Get it started and begin to spin the fidget spinner slowly to make sure it's detecting the magnetized arm.
If not you might need to magnetize the arm again. You should be able to a noticeable spike as the magnetized arm passes close to the phone. 
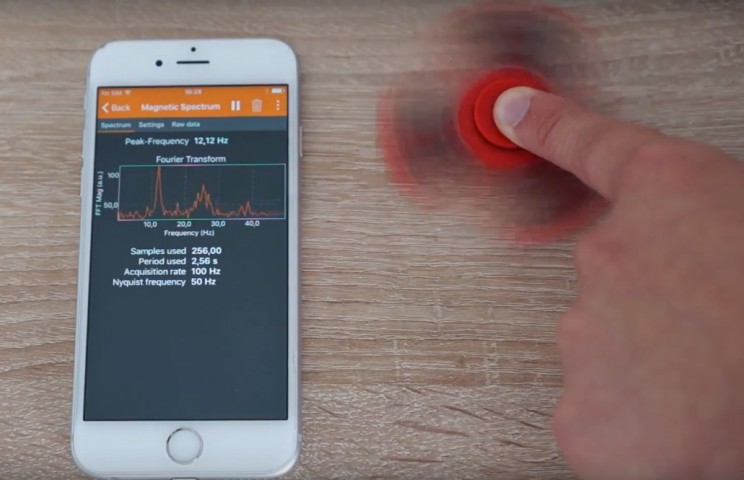
Now for the fun bit. Close the experiment and find the magnetic spectrum experiment under the 'tools' heading (in Phyphox). 
Fire this experiment up, start spinning your magnetized spinner and watch the app calculate the fidget spinner's frequency in front of your eyes. It should appear as a noticeable peak.
fun phone experiments fidget spinner
 

Experiment #9 - Build and 'speed test' your own balloon powered car

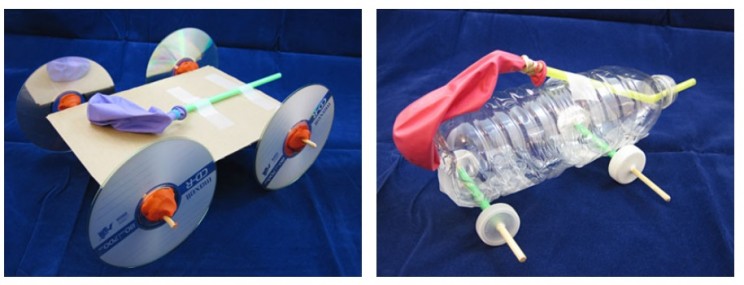
Unlike other experiments on this list, you will need a fair amount of materials to perform this experiment. You might have a few of the necessary items lying around the house but it might be necessary to spend just a few bucks at your local hardware shop.
What materials you will need will depend on your final design of 'car' but in general you will need something like the following. Remember the design will need to be strong enough to actually 'take the weight' of your phone:-
- Something to build four wheels (CD's, bottle caps or anything else round will do);
- Something to build the axles (wooden skewers, toothpicks, chopsticks etc);
- Something to form the chassis (cardboard, plywood plastic bottles etc);
- Balloons - obviously;
- Tape and/or glue to stick everything together;
- Straws to allow you to inflate the balloon/control the deflation of the balloon to generate thrust direction;
- Things to cut with - scissors etc and;
- Other than that anything goes.
fun phone science experiments balloon cars
 
There is a challenge you can take part in here if you want to enter your design (but it does have strict material requirements). You can either follow instructions like this to build one of these cars or devise your own and experiment to find which offer the best acceleration. 
Whatever design you go for you will want to quantify the performance of the final vehicle. This is where your smartphone and app comes into play so make sure you make allowance for the phones size and weight into your design.
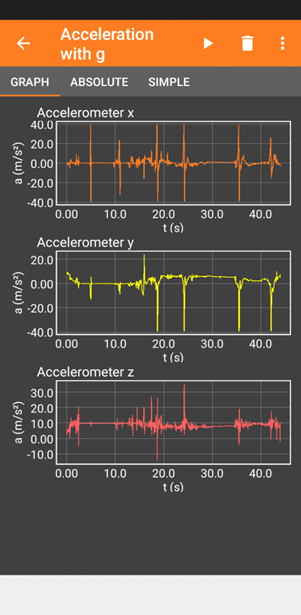
With your very own balloon-car built its time to see how fast it can go. Activate your app and find the accelerometer function.
Start it up, strap your phone onto the chassis (if you haven't already), inflate your balloon(s) and let it go. You can play around until you get the acceleration up to a rate of your liking. 
fun phone science experiments balloon car

Experiment #10 - Build and test an Earthquake proof model building foundation

And last, but by no means least, is an experiment that will test your civil engineering skills (if you have any). This experiment will once again utilize your phone's accelerometer to build the most efficient earthquake attenuation system you can think of.
As the experiment above the material, you'll need will depend on your design of earthquake-proofing but you'll be using your smartphone (and app) to gather data on its performance.
in general, you will likely need:-
- Some form of building model - you can use a simple cardboard box or build your own elaborate alternative
- A base to shake by hand - a large sheet of cardboard is usually fine
- Materials for your earthquake foundations - pens for rollers, springs, elastic bands, slinkies
- Adhesive materials to stick things together - tape, glue, elastic bands etc
- Things to cut with - scissors etc
Once you are happy with your earthquake-proof design its time to test it. Open your data collection app (e.g. Phyphox), place/affix it on top of your building and get 'earthquake-simulating' by moving the cardboard base from side to side. 
Your phone will then access the maximum and minimum movement and provide you with reference data from which to improve your design to reduce this to the lowest possible value.
Good luck!


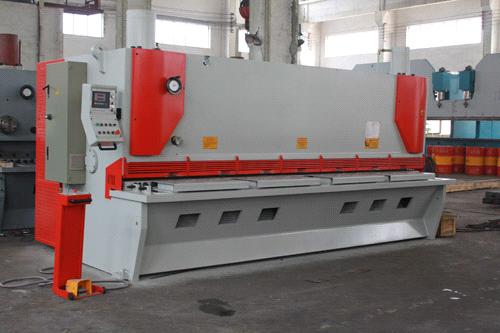
The ways in which metal can be cut, are largely classified into 3 types, laser method, by using machinery or by using hand tools. Depending on how the expected outcome and the size of the metal that has to be cut, the method of cutting is used. Laser technology and usage of hand tools are methods that are used in extreme points. So using machinery to cut iron is the most widely and commonly used method to cut machinery.
Metal Cutting Machines
Methods:
Different products require different levels of smoothness of the surface. So depending on that different techniques are employed to cut the metals using machinery. The methods are as follows
·         Grinder: This method is employed when the surface of the product needs to be extremely smooth. The surface of a rough iron mold is rough, so they choose to grind with an abrasive tool that will even out the surface and make it smooth
·         Lathe and Punch: Lathe and Punch both aim at cutting the material into the desired shape but the techniques employed are different. While in lathe employs a sharp tool to carry out the process, in the punch method an extreme amount of pressure is applied to get the iron to a proper shape.
·         Water jet: As the name self-suggests, plain water or water mixed with abrasive compound are gushed onto the surface of the iron at a pressure point that cut the metal into pieces.
·         Flame and Plasma: There is not much of a difference between Flame and Plasma and Waterjet. In waterjet, water is used whereas in Flame, and Plasma flammable gas is used to cut the metal.

The Best 5 Metal cutters are listed below:
Oxy-Fuel Cutting:
Oxy fuel is largely used in cases where the cutting process demands a high level of accuracy as in cutting metal pipes below the ground level. Under this method heat and gas is spewed at the right mixture to make the cutting process easier. Also the flame and as flow in cross-sections so that the gas and heat come out at the right flame
Plasma cutters:
Though they aren’t as accurate as laser cutting, they are to great extent reliable depending on the thickness of the material that has to be cut. The Plasma Cutters are accurate to the extent to which simple measurements are required however the laser takes over when in-depth measurements that demand a maximum level of accuracy are required.
Laser Cutters:
As stated earlier, if a job demands a high level of accuracy the only option that serves the purpose is laser cutting. Laser cutting is one among the advanced techniques that have proven to be highly useful as far as cutting metal are concerned. A beam of light that is no larger than a line is emitted out of these laser machines that cut the metal into pieces. The heat that accompanies the light is above the melting point of the metal.
Laser cutting is the major technology used in metal cutting. They are further classified into two:
CO2 Laser Cutters:
CO2 Laser Cutters include ‘Fastlacer’ technologies that increase the speed of cut, improved the plate capacity and cut quality range. The machine emits gas along with heat, and the light emitted matches the gas flow geometry.
Fibre Laser Cutters:
In Fibre Laser Cutters the cutters emit fiber optic rays, and these cutters are available in 12 different models. Also, the cutters come as single point laser cutters and multi-point laser cutters.

Powered by Blogger.